End-to-end setup for ringing and accepting calls when the app is backgrounded or killed — Android (FCM) and iOS (PushKit VoIP + CallKit) configured separately.
Background Calling
Foreground calling works with Hosted Signaling alone. Background calling is what lets your app ring, show native incoming UI, and connect media when the callee’s app is in the background or force-quit.
This guide is split by platform — configure Android and iOS independently, then wire the shared JavaScript layer.
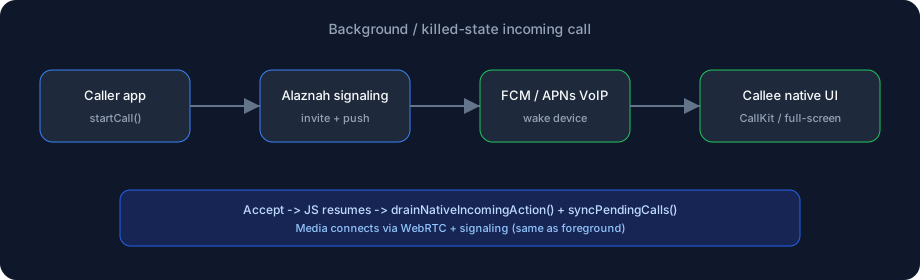
What you need before you start
| Requirement | Android | iOS |
|---|---|---|
| Physical device for kill-state test | Required | Required |
| Push credentials in Alaznah Console | FCM server key | APNs .p8 + Key ID + Team ID + Bundle ID |
| Host app push package | @react-native-firebase/messaging (recommended) | None — SDK owns PushKit |
| Manifest / capabilities | See Permissions → Android | Push + Background Modes (voip, audio) |
| Display names | Required: config.displayName + startCall({ calleeDisplayName }) | Same |
Simulator limits: iOS Simulator cannot show CallKit incoming rings or AVKit PiP. Android emulators may not deliver FCM reliably when killed. Always validate on real hardware.
Step 1 — Configure push in Alaznah Console
Sign in at console.alaznah.com → select your project → Push credentials.
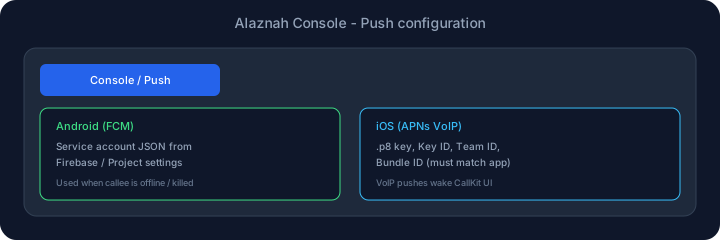
Bind credentials to the same project you use when minting calling tokens. Mismatched project / bundle / package = silent push failure.
| Field | Platform | Where to get it |
|---|---|---|
| FCM server key | Android | Firebase Console → Project settings → Cloud Messaging → Server key (legacy) |
| APNs Key ID | iOS | Apple Developer → Keys → your APNs Auth Key |
| Team ID | iOS | Apple Developer → Membership |
| Bundle ID | iOS | Must match your Xcode target exactly |
| .p8 private key | iOS | Download when creating the APNs Auth Key (one-time) |
After saving, signaling can wake offline devices when an invite is sent. Until credentials are configured, kill-state incoming stays unreliable — see Troubleshooting.
Android — background & killed-state calling
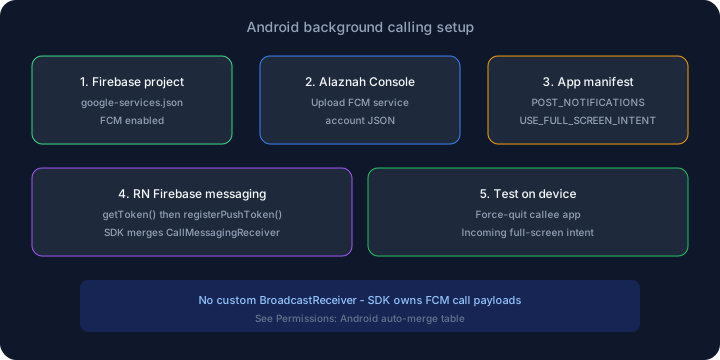
1. Create a Firebase project
- Open Firebase Console → Add project (or use an existing one).
- Add Android app with your application ID (
com.example.app— same asapplicationIdin Gradle). - Download
google-services.json→ place inandroid/app/google-services.json. - Ensure the Firebase Android Gradle plugin is applied (standard React Native Firebase setup).
2. Upload FCM credentials to Alaznah
Copy the FCM server key from Firebase → Project settings → Cloud Messaging and paste it in the console Push credentials form (Step 1 above).
3. Add Android permissions
Merge these into your app AndroidManifest.xml (or use the copy-paste block in Permissions):
POST_NOTIFICATIONS(Android 13+)USE_FULL_SCREEN_INTENT— full-screen incoming UI when lockedFOREGROUND_SERVICE+FOREGROUND_SERVICE_PHONE_CALL— ongoing call keep-aliveWAKE_LOCK,VIBRATEas needed
You do not declare a custom FCM BroadcastReceiver for Alaznah calls — the SDK merges that for you (next section).
4. Install React Native Firebase Messaging
npm install @react-native-firebase/app @react-native-firebase/messagingRebuild the native app after install. The SDK forwards non-call FCM messages to React Native Firebase when that package is present; call invite / cancel payloads are handled natively first.
5. What @alaznah/calling merges automatically
After npm install @alaznah/calling, the library manifest merges into your app — no host Kotlin/Java required for standard RN apps:
| Merged by SDK | Purpose |
|---|---|
CallMessagingReceiver | Handles incoming_call / call_canceled when app is killed |
| Removes default RN Firebase messaging receiver | Avoids duplicate notifications for call payloads |
IncomingCallActivity + foreground services | Full-screen incoming + ongoing call UI |
PiP attrs on ${applicationId}.MainActivity | Video PiP on Home — Picture in Picture |
Reference: Permissions → Android auto-merge.
6. Obtain the FCM token (JavaScript)
Request notification permission, then read the device token:
import { getApp } from '@react-native-firebase/app';
import {
  getMessaging,
  getToken,
  onTokenRefresh,
  requestPermission,
} from '@react-native-firebase/messaging';
import { PermissionsAndroid, Platform } from 'react-native';

async function getAndroidFcmToken(): Promise<string | null> {
  if (Platform.OS !== 'android') return null;

  if (Platform.Version >= 33) {
    const granted = await PermissionsAndroid.request(
      PermissionsAndroid.PERMISSIONS.POST_NOTIFICATIONS,
    );
    if (granted !== PermissionsAndroid.RESULTS.GRANTED) return null;
  }

  const messaging = getMessaging(getApp());
  await requestPermission(messaging);
  return getToken(messaging);
}
Re-subscribe to onTokenRefresh and call registerPushToken again when the token rotates.
7. Register the token with Alaznah
After useCallingReady() is true and the user is connected:
import { Platform } from 'react-native';

await client.registerPushToken(fcmToken, 'android');
If you use <CallingScreen pushToken={...} pushPlatform="android" />, token registration can be automatic — see Call UI.
8. Handle foreground FCM data (optional)
When the app is foreground, the SDK may already show in-app incoming UI via signaling. For data-only FCM messages that arrive while open, sync pending calls:
import { handleBackgroundIncomingCall } from '@alaznah/calling';

// On FCM data message with type incoming_call or call_canceled:
await handleBackgroundIncomingCall({ data: message.data });
await client.syncPendingCalls();
Full wiring example: alaznah-examples/basic-call → src/useFirebase.ts + App.tsx.
9. Android test checklist
| Step | Expected result |
|---|---|
Install release/dev build on Device A and Device B with different userIds | Both connect to signaling |
| Register FCM tokens (log token in dev) | Console project has FCM key saved |
| Caller starts voice/video call | Callee rings in foreground |
| Callee sends app to background | Incoming UI still appears |
| Callee force-quits the app | Full-screen incoming intent on lock screen |
| Callee taps Accept | App opens → call connects without duplicate JS incoming flash |
| Callee taps Decline | Call ends; no stuck notification |
iOS — background & killed-state calling
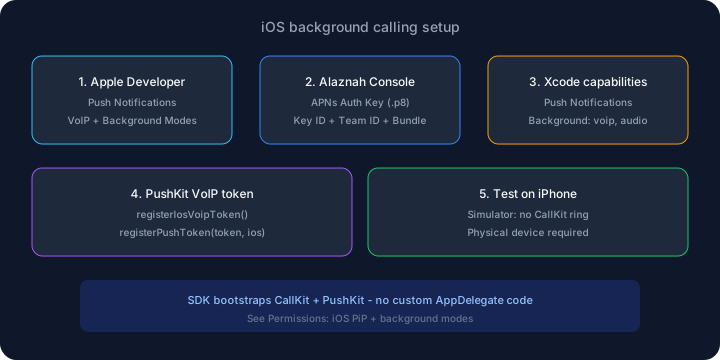
1. Enable capabilities in Apple Developer
For your App ID:
- Enable Push Notifications.
- Enable Background Modes → Voice over IP and Audio (and Remote notifications if you also use standard APNs alerts).
Create an APNs Auth Key (.p8) if you do not have one. Note the Key ID and your Team ID.
2. Upload APNs credentials to Alaznah
In console Push credentials, enter Key ID, Team ID, Bundle ID, and paste the .p8 key (Step 1 above). Bundle ID must match Xcode exactly.
3. Configure Xcode
Target → Signing & Capabilities:
| Capability | Required for |
|---|---|
| Push Notifications | APNs delivery |
| Background Modes → Voice over IP | PushKit wake when killed |
| Background Modes → Audio | Media + video PiP while backgrounded |
| Background Modes → Remote notifications | Optional; standard alerts |
Add usage strings to Info.plist:
NSMicrophoneUsageDescriptionNSCameraUsageDescription(video calls)
Expo: the @alaznah/calling config plugin injects audio, voip, and remote-notification — still verify after prebuild.
4. What @alaznah/calling bootstraps automatically
No custom AppDelegate CallKit / PushKit code in your host app. On pod load the SDK:
| SDK native (automatic) | Purpose |
|---|---|
| PushKit registry | VoIP push token for kill-state wake |
| CallKit provider | Native incoming call UI (Accept / Decline) |
| CallKit ↔ WebRTC audio bridge | Media after accept |
registerIosVoipToken / onIosVoipToken JS bridge | Token → your JS → registerPushToken |
Important: FCM alone is not enough for iOS kill-state incoming. You must register the PushKit VoIP token, not the FCM token, with
registerPushToken(..., 'ios').
5. Obtain the VoIP token (JavaScript)
import {
  onIosVoipToken,
  registerIosVoipToken,
} from '@alaznah/calling';

// On app start (iOS only):
const voipToken = await registerIosVoipToken();

// Listen for rotation:
const unsubscribe = onIosVoipToken((token) => {
  void client.registerPushToken(token, 'ios');
});
Standard notification permission (requestPermission from Firebase or @react-native-community/push-notification-ios) is independent from VoIP — denying alert permission must not block CallKit incoming calls.
6. Register the token with Alaznah
await client.registerPushToken(voipToken, 'ios');Call again whenever onIosVoipToken fires or after reconnect.
7. App resume after native Accept / Decline
When the user acts on CallKit UI and JS becomes active:
import { AppState } from 'react-native';

AppState.addEventListener('change', async (state) => {
  if (state !== 'active') return;
  await client.drainNativeIncomingAction();
  await client.syncPendingCalls();
});
drainNativeIncomingAction() prevents a duplicate JS incoming screen after the user already accepted on CallKit. syncPendingCalls() attaches any pending invite session.
CallingUI / CallingContext call drainNativeIncomingAction on mount — you still want the AppState hook if you have custom navigation.
8. iOS test checklist
| Step | Expected result |
|---|---|
| Test on physical iPhone (not Simulator) | CallKit ring appears |
| Callee force-quits app | VoIP push wakes device → CallKit incoming |
| Lock screen incoming | Caller display name shown (not raw user id) |
| Accept from CallKit | App foregrounds → media connects |
| Decline from CallKit | Call ends cleanly |
| Background video call → Home | PiP on device (Simulator: use in-app minimize — Picture in Picture) |
Shared JavaScript integration
Minimal pattern (adapt from basic-call App.tsx):
import { useEffect } from 'react';
import { AppState, Platform } from 'react-native';
import {
  CallingProvider,
  useCallingClient,
  useCallingReady,
} from '@alaznah/calling';

function PushRegistration({ fcmOrVoipToken }: { fcmOrVoipToken: string | null }) {
  const client = useCallingClient();
  const ready = useCallingReady();

  useEffect(() => {
    if (!ready || !fcmOrVoipToken) return;
    void client.registerPushToken(
      fcmOrVoipToken,
      Platform.OS === 'ios' ? 'ios' : 'android',
    );
  }, [client, ready, fcmOrVoipToken]);

  useEffect(() => {
    if (!ready) return;
    const sub = AppState.addEventListener('change', (state) => {
      if (state !== 'active') return;
      void client.drainNativeIncomingAction();
      void client.syncPendingCalls();
    });
    return () => sub.remove();
  }, [client, ready]);

  return null;
}
End-to-end flow (both platforms)
- Caller invokes
startCall({ calleeId, calleeDisplayName, … }). - Signaling delivers the invite over WebSocket if callee is online.
- If callee is offline / killed, signaling sends FCM (Android) or APNs VoIP (iOS).
- Native layer shows incoming UI with caller display name.
- Accept → JS resumes →
drainNativeIncomingAction+syncPendingCalls→ WebRTC media same as foreground.
Details on invite handling: Incoming Calls.
Troubleshooting
| Symptom | Likely cause | Fix |
|---|---|---|
| No ring when app killed | Console push not configured | Upload FCM / APNs in console; verify project matches token mint |
| Android: no full-screen incoming | Missing USE_FULL_SCREEN_INTENT or OEM battery restrictions | Permissions manifest + disable aggressive battery saver for test |
| iOS: no ring on Simulator | Expected limitation | Test on physical iPhone |
| iOS: no ring on device | Registered FCM token instead of VoIP | Use registerIosVoipToken() → registerPushToken(..., 'ios') |
| Duplicate incoming UI (native + JS) | Missing drain on resume | drainNativeIncomingAction() on AppState active |
| Caller id / “Unknown caller” | Missing display name | Set config.displayName; pass calleeDisplayName on outbound calls (both required) |
| Call works foreground only | Token not registered | Log token; confirm registerPushToken after ready |
| Same user on both devices | Signaling rejects self-call | Use two distinct userIds |
More: Troubleshooting.
Related
- Incoming Calls — invite flow, accept/decline, signaling
- Permissions — manifest, Info.plist, SDK auto-merge tables
- Native Modules — CallKit / FCM receiver / FGS (what you add vs autolink)
- Picture in Picture — Home / Minimize on a connected call (not kill-state)
- Call UI —
CallingScreenpush props - Examples —
basic-callreference app - What's new —
0.1.0(PiP grace, wake-Accept, display names) - Hosted Signaling — token mint + project binding